How to Automate Raspberry Pi Python Scripts with OpenClaw
The Raspberry Pi 5 scores 764 on Geekbench 6.2 single-core, 2.4 times what the Pi 4 managed, yet most Raspberry Pi Python tutorials still assume you are typing every script by hand. OpenClaw changes that equation by letting an AI agent write, debug, and execute Python on the Pi directly from natural language prompts.


What OpenClaw Actually Does on a Raspberry Pi
Raspberry Pi Foundation benchmarks show the Pi 5 hitting 764 points on Geekbench 6.2 single-core, up from 340 on the Pi 4. That 2.4x jump comes from the switch to Cortex-A76 cores, and it makes the Pi 5 a surprisingly capable host for an AI agent that generates and executes Python in real time.
OpenClaw is an open-source AI agent framework that bridges natural language and system actions. Where a chatbot generates text, OpenClaw goes further: it creates files, runs shell commands, installs packages, reads sensor data, and writes Python scripts. On a Raspberry Pi, that means you can describe what you want in plain English and the agent handles the rest, from importing the right library to executing the finished script and reporting results.
The practical difference is significant. Traditional Raspberry Pi Python programming requires you to know which GPIO library to import, how to initialize an I2C bus, and the correct register addresses for your sensor. With OpenClaw, you describe the outcome: "Read the temperature from the BME680 sensor every 30 seconds and save the results to a CSV." The agent figures out the implementation details.
This is not a theoretical capability. The Adafruit Learning System published a full walkthrough showing OpenClaw on a Pi reading BME680 sensor data, including temperature (19.8 degrees C), humidity (16.8%), barometric pressure (1006.5 hPa), and gas resistance (35,910 ohms). The agent installed the libraries, wrote the test script, diagnosed an I2C address issue when the STEMMA QT connector was loose, and documented its own tooling for future reference.
A Pi 4 with 4GB handles the workload without issues. The Pi does not run the language model locally by default. It acts as a gateway, forwarding prompts to a cloud LLM (Claude, GPT-4, or Gemini) and executing whatever Python the model generates. That relay architecture keeps memory and CPU usage low enough that even the Pi 4 rarely breaks a sweat.
Related guides
- How to Automate Perplexity Personal Computer with ZapierPerplexity Personal Computer gives you an always-on AI research agent that runs continuously on your behalf. Zapier...
- How to Automate Web Scraping With Hermes Agent's Scrapling SkillHermes Agent's Scrapling skill gives your AI agent three distinct scraping strategies, from fast HTTP fetching for...
- How to Automate Workflows with OpenClaw Webhooks on Raspberry PiA Raspberry Pi running OpenClaw as a systemd service becomes an always-on AI agent that responds to webhook triggers...
- How to Automate Your Chicken Coop Door with OpenClaw on Raspberry PiBackyard chicken keepers have relied on timers and light sensors to open and close coop doors for years. This guide...
- How to Automate Your Garage Door with OpenClaw on Raspberry PiGuide to openclaw raspberry garage door physical access automation agent: Most Raspberry Pi garage door projects stop...
- How to Automate a Greenhouse or Hydroponics System with OpenClaw on Raspberry PiMost Raspberry Pi greenhouse and hydroponics projects rely on hardcoded thresholds: if pH drops below 5.8, add base...
More on this subject: OpenClaw on Raspberry Pi (192 guides)
How to Install OpenClaw on a Raspberry Pi
OpenClaw needs a 64-bit Raspberry Pi OS and Node.js 24. The minimum hardware is a Pi 4 with 2GB RAM, though 4GB is the practical sweet spot. A Pi 5 with 4GB or 8GB is the fast option. Avoid the Pi Zero 2 W for OpenClaw. Its 512MB RAM is not enough.
Before you start, gather these:
- Raspberry Pi 4 (4GB+) or Pi 5
- 16GB+ microSD card or USB SSD (SSD recommended for longevity)
- Official power supply
- Network connection (Ethernet or Wi-Fi)
- An API key from Anthropic, OpenAI, or Google
Step 1: Flash the OS. Use Raspberry Pi Imager to install Raspberry Pi OS Lite (64-bit). Enable SSH during setup so you can connect headless.
Step 2: Update and install prerequisites. Connect via SSH and run system updates. Install git, curl, and build-essential if they are not already present.
Step 3: Install Node.js 24. OpenClaw depends on Node.js. The NodeSource setup script handles the installation for ARM64.
Step 4: Install OpenClaw. The official one-line installer downloads the CLI, installs it globally via npm, and launches the onboarding wizard. During onboarding, select your AI provider and paste in your API key.
Step 5: Verify the installation. Run openclaw status to confirm the agent is running. If you plan to keep OpenClaw active across reboots, the onboarding wizard offers a daemon option that registers a systemd service.
Performance tuning for constrained hardware:
- Use a USB SSD instead of a microSD card. SD cards wear out faster under the constant small writes that an agent generates
- Reduce GPU memory to 16MB in /boot/firmware/config.txt since a headless Pi does not need video memory
- On 2GB boards, create a 2GB swap file so Node.js does not get killed during heavy tool-use sessions
- Disable Bluetooth and other unused services to free memory

Wiring a BME680 Sensor for Automated Readings
The BME680 is a good first sensor for OpenClaw automation because it returns four distinct measurements from a single chip: temperature, humidity, barometric pressure, and volatile organic compound (VOC) gas resistance. It connects to the Pi over I2C, which means four wires and no soldering if you use a breakout board with a STEMMA QT connector.
Wiring the sensor to the Pi:
- SDA on the BME680 to GPIO 2 (SDA) on the Pi
- SCL on the BME680 to GPIO 3 (SCL) on the Pi
- VIN on the BME680 to the 3.3V pin on the Pi
- GND on the BME680 to any ground pin on the Pi
The sensor defaults to I2C address 0x77. Some boards use 0x76 instead. If the sensor does not respond, check the address with i2cdetect -y 1 from the command line. The Adafruit walkthrough noted that a loose STEMMA QT connector caused the sensor to appear at address 0x38, which is incorrect. Reseating the connector fixed the issue immediately.
Installing the Python libraries:
OpenClaw needs the Adafruit Blinka library to access GPIO pins from Python. Blinka provides a CircuitPython compatibility layer that lets Pi Python code use the same sensor libraries as microcontrollers. On top of Blinka, install the BME680-specific driver from PyPI: adafruit-circuitpython-bme680.
You can install these manually, or you can ask OpenClaw to do it. The agent is capable of creating a virtual environment, running pip install commands, and verifying that the libraries loaded correctly. In the Adafruit guide, OpenClaw created the venv at ~/.openclaw/workspace/openclaw_venv with system site-package access, installed the sensor driver, and confirmed the I2C bus was working before writing any measurement code.
What the readings look like:
A successful BME680 read returns four values. In testing documented by Adafruit, the sensor reported temperature at 19.8 degrees C (with a common -5 degree offset applied because the chip runs warm), humidity at 16.8%, pressure at 1006.5 hPa, and gas resistance at 35,910 ohms. The agent can calculate altitude from the pressure reading as well, which came out to roughly 56 meters in that test.


Persist Your Pi Automation Output in a Shared Workspace
MCP-ready for direct agent uploads.
Asking OpenClaw to Write and Run Python Scripts
The core workflow is straightforward. You describe what you want in natural language, OpenClaw writes a Python script, saves it to the workspace directory, executes it, and reports the output. If the script fails, the agent reads the traceback, edits the file, and tries again.
Example prompt for sensor polling:
Tell the agent: "Read the BME680 sensor every 30 seconds and print the temperature, humidity, and pressure." OpenClaw will import the correct libraries (board, busio, adafruit_bme680), initialize the I2C bus, create a polling loop with time.sleep(30), and print formatted output. It saves the script to the workspace so you can run it again later or modify it.
Example prompt for GPIO control:
"Turn on the LED connected to GPIO 17 for 5 seconds, then turn it off." The agent writes a script using the appropriate GPIO library, sets the pin as output, toggles the state, waits, and cleans up. For the Pi 5, OpenClaw uses the gpiod library instead of the older RPi.GPIO, since the Pi 5 moved GPIO management behind a new controller chip (RP1) that requires the newer interface.
Example prompt for file automation:
"Every hour, read all four BME680 values and append them as a new row to /home/pi/sensor_log.csv with a timestamp." The agent writes a script with datetime formatting, CSV writing, and the sensor polling code, then explains how to schedule it with cron or run it as a persistent process.
What happens under the hood:
OpenClaw does not generate code in a vacuum. It has tool-use capabilities that let it run shell commands and read file contents. When you ask it to work with a sensor, it first checks whether the required libraries are installed (pip list), verifies the I2C bus is active (i2cdetect), and only then writes the script. If something fails at runtime, it reads the error output and iterates. This feedback loop is what separates it from copy-pasting code from a tutorial. The agent adapts to your specific hardware configuration.
Where the scripts live:
OpenClaw stores everything in ~/.openclaw/workspace/. Scripts, virtual environments, configuration files, and a TOOLS.md file that the agent maintains as its own reference for what hardware and libraries are available. This workspace persists across sessions, so the agent remembers what sensors are connected and what libraries are installed the next time you ask it to do something.
Storing Sensor Data and Sharing Automation Output
A Raspberry Pi running OpenClaw generates data: sensor logs, generated scripts, configuration files, backup archives. Keeping all of that on the Pi's microSD card is risky. Cards fail, especially under the constant small writes that logging produces. You need a storage layer that lives outside the Pi itself.
Local options: You can mount an external USB drive or NFS share and have OpenClaw write logs there. For a single Pi on a home network, this works fine. The downside is that the data is still physically local. If you want to check sensor readings from your phone or share a dashboard with someone else, you need another layer.
Cloud storage options: S3, Google Drive, and Dropbox all work if you configure API credentials. The agent can upload files using their respective CLIs or Python SDKs. The setup overhead varies. S3 needs IAM credentials and bucket policies. Google Drive needs OAuth token management.
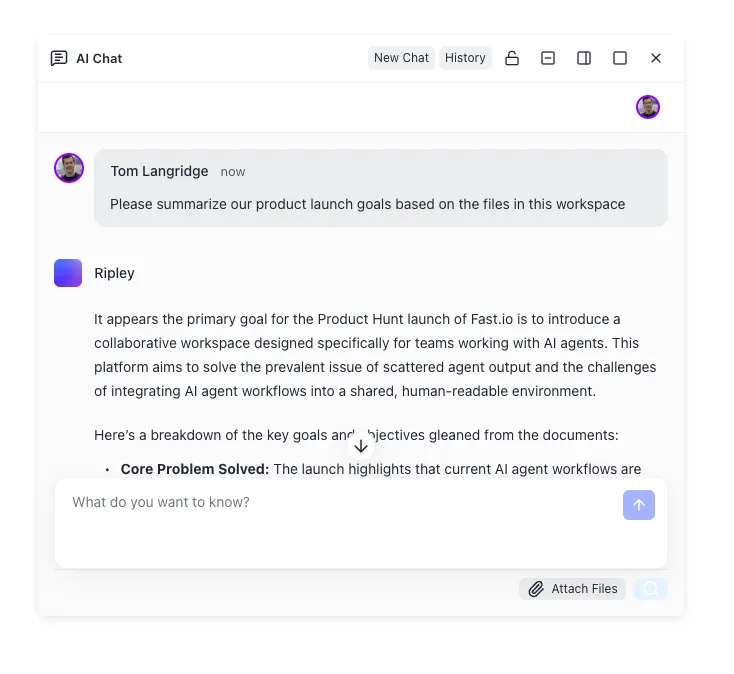
Fast.io simplifies the cloud storage step for agent workflows, offering a 14-day Business Trial, card required (see pricing). The agent can push files through the Fast.io MCP server using Streamable HTTP, which means no OAuth dance or credential rotation. Upload a sensor log, create a branded share link, and send it to a colleague or client. When Intelligence Mode is enabled on a workspace, uploaded CSVs and documents are automatically indexed for semantic search and AI chat, so you can ask questions like "What was the peak temperature last Tuesday?" without writing a query.
The ownership transfer feature is useful for consulting and contractor work. An OpenClaw agent can build an entire workspace (sensor dashboards, log archives, generated scripts), then transfer the organization to a client. The agent retains admin access for maintenance while the client becomes the owner.
Practical workflow for sensor data:
- OpenClaw reads the BME680 every 30 seconds and appends rows to a local CSV
- Every hour, the agent compresses the CSV and uploads it to a Fast.io workspace
- Once Intelligence Mode is enabled, it indexes uploaded files for search and chat
- You check readings from any device by opening the workspace or asking questions through the AI chat interface
This pattern works for any Pi automation output, not just sensor data. Generated scripts, system health reports, camera captures, and backup archives all benefit from off-device storage with a sharing layer on top.
How to Fix Common OpenClaw and Pi Hardware Issues
I2C device not detected: Run i2cdetect -y 1 to scan the bus. If the sensor does not appear at 0x77 or 0x76, check the physical connection. Loose STEMMA QT connectors are the most common cause. The Adafruit guide documented a case where a loose connector made the sensor appear at 0x38, which is not a valid BME680 address. Reseating the cable fixed it immediately.
Out of memory on 2GB boards: OpenClaw's Node.js process can spike during complex tool-use chains. Create a 2GB swap file and verify it with free -h. Disable unused services (Bluetooth, CUPS, Avahi) to reclaim memory. If the agent still runs out, switch to a 4GB board.
Slow script execution: If Python scripts take noticeably longer than expected, check for thermal throttling with vcgencmd get_throttled. The Pi 5 requires active cooling for sustained workloads. Without a fan or heatsink, it thermal-throttles to Pi 4 speeds after roughly three minutes under load. A basic aluminum heatsink and fan from the official Pi 5 case solve this for under $10.
GPIO library errors on Pi 5: The Pi 5 uses the RP1 I/O controller, which changes how GPIO access works at the kernel level. The older RPi.GPIO library does not support the Pi 5 natively. Use gpiod or lgpio instead. Adafruit Blinka handles this automatically when it detects a Pi 5, but if you are writing scripts manually or asking OpenClaw to use a specific library, specify gpiod for Pi 5 compatibility.
OpenClaw daemon not starting after reboot: Check the systemd service with systemctl --user status openclaw-gateway.service. If it is not enabled, run sudo loginctl enable-linger $USER to allow user-level services to start without a login session. Review logs with journalctl --user -u openclaw-gateway.service -f for specific error messages.
Wi-Fi drops during long automation runs: Raspberry Pi Wi-Fi power management can disconnect the board during idle periods between agent tasks. Disable power management with sudo iwconfig wlan0 power off. For reliability-critical deployments, use Ethernet instead.
Sources
References used to verify factual claims in this guide.
-
Pi 5 scores 764 on Geekbench 6.2 single-core vs 340 for Pi 4 (2.4x improvement)
-
BME680 sensor readings: 19.8°C temperature, 16.8% humidity, 1006.5 hPa pressure, 35,910 ohm gas resistance on Pi with OpenClaw
-
OpenClaw installation requires Node.js, 64-bit OS, minimum 1GB RAM; Pi 5 rated 'Best', Pi 4 4GB rated 'Good'
-
Running OpenClaw on a standalone device like a Raspberry Pi provides isolation, control, and peace of mind for security
Frequently Asked Questions
Can OpenClaw run Python scripts on Raspberry Pi?
Yes. OpenClaw can create Python files, install libraries via pip, execute scripts, read the output, and iterate if errors occur. It uses tool-use capabilities to run shell commands directly on the Pi, so the entire write-run-debug cycle happens automatically from a natural language prompt.
How do I control GPIO pins with OpenClaw?
Describe the GPIO action you want in plain English. OpenClaw writes the appropriate Python script using gpiod (on Pi 5) or RPi.GPIO (on Pi 4 and earlier), sets pin modes, toggles outputs, and reads inputs. For I2C sensors like the BME680, the agent installs Adafruit Blinka and the relevant CircuitPython driver, then writes polling scripts that read and format the sensor data.
What Python libraries work with OpenClaw on Raspberry Pi?
Any library you can install with pip works. OpenClaw commonly uses Adafruit Blinka for GPIO access, adafruit-circuitpython-bme680 for environmental sensors, gpiod for Pi 5 GPIO control, and standard libraries like csv, datetime, and json for data handling. The agent can also install and use NumPy, Pandas, or Matplotlib if your project needs data processing or visualization.
Can I automate Raspberry Pi tasks with AI?
OpenClaw turns a Raspberry Pi into an AI-driven automation platform. You describe tasks in natural language, and the agent writes and runs the Python scripts to accomplish them. Common automations include sensor polling on a schedule, GPIO-triggered alerts, file backups to cloud storage, and system health monitoring. The agent persists its workspace across sessions, so automations survive reboots.
Does OpenClaw work offline on Raspberry Pi?
By default, OpenClaw sends prompts to a cloud LLM like Claude or GPT-4 and needs an internet connection. For offline use, you can configure OpenClaw to work with locally hosted models through Ollama, llama.cpp, or LocalAI. Local models handle fast, iterative tasks well, though they may not match cloud models for complex code generation.
Which Raspberry Pi model is best for OpenClaw Python automation?
The Pi 5 with 4GB or 8GB RAM is the fast option, scoring 2.4 times higher than the Pi 4 on single-core benchmarks. The Pi 4 with 4GB remains a solid choice at a lower price point, especially since the Pi itself does not run the language model. Avoid the Pi Zero 2 W, as its 512MB RAM is insufficient for OpenClaw.
Related Resources

Persist Your Pi Automation Output in a Shared Workspace
MCP-ready for direct agent uploads.