Video Localization: How to Share Files for Translation and Dubbing
Video localization is the process of adapting video content for different languages and regions, including translation, subtitling, dubbing, and cultural adaptation. Managing the massive file transfers between production teams and localization vendors can be a logistical nightmare without the right workflow. This guide breaks down the entire localization pipeline and shows you how to organize, share, and track assets so your global content launches on time.
What Is Video Localization?
Video localization goes beyond simple translation. It involves adapting every aspect of a video, including audio, on-screen text, graphics, and cultural references, to resonate with a specific target audience. The goal is to make content feel native to viewers in each market, not just understandable. While translation converts text from one language to another, localization considers cultural context. A joke that lands in English might fall flat in Japanese. A color that signals celebration in one culture might represent mourning in another. Localization teams address these nuances so your message connects emotionally, not just linguistically. The business case for localization is clear. According to industry research, localized content sees higher engagement rates than non-localized content. For streaming platforms, localized content drives subscriber retention in international markets. For corporate training, it ensures compliance and comprehension across global offices. For marketing campaigns, it can mean the difference between viral success and cultural misstep. A typical localization project requires collaboration with multiple specialists. The average video requires coordination with multiple vendors, including translators who handle scripts, voice actors for dubbing, subtitle editors who time captions, audio engineers who mix new tracks, and QA specialists who verify the final output. Coordinating these teams across time zones, while keeping massive video files secure and version-controlled, requires a reliable system for sharing assets. Without one, projects drag on, budgets balloon, and deadlines slip.
Helpful references: Fast.io Workspaces, Fast.io Collaboration, and Fast.io AI.
The Standard Video Localization Workflow
Understanding the lifecycle of a localized video helps identify where file sharing bottlenecks occur. Most localization projects follow a five-stage workflow, each with distinct asset requirements and collaboration needs.
Stage 1: Asset Preparation The production team gathers all necessary files for handoff. This includes the video master (typically ProRes or DNxHR at full resolution), separate audio stems with dialogue isolated from music and effects (the M&E track), time-coded scripts in editable formats, and project files for any graphics that need text replacement. The preparation stage often takes 2-3 days for a 30-minute piece because the original editor must export stems that may not have been planned for during initial production.
Stage 2: Handoff to Vendors Files are transferred to the localization vendor or distributed to specialized teams. This is where delays commonly happen. A single 30-minute ProRes file can exceed 50GB. Multiply that by audio stems, reference files, and graphics projects, and you are looking at massive volumes per language variant. Traditional email and consumer file sharing services cannot handle these volumes without compression or splitting.
Stage 3: Adaptation Translators work on scripts, voice actors record dubs in studio sessions, and graphic artists adjust on-screen text and lower thirds. This stage happens in parallel across language teams, which means multiple vendors may be downloading the same source files simultaneously. If your file sharing system throttles concurrent downloads, the Spain team might be waiting while the France team downloads.
Stage 4: Quality Assurance Localized versions are reviewed for linguistic accuracy, lip-sync timing, subtitle readability, and technical compliance. QA reviewers need quick access to both the localized version and the original for comparison. They also need a way to log feedback with frame-accurate timestamps so editors can address issues efficiently.
Stage 5: Delivery Final localized masters are delivered back to the client for distribution. This stage reverses the handoff problem: now vendors must upload large completed files. The project manager must track which languages have delivered, verify file integrity, and archive everything for future use. A single missing file can delay a global launch.
Why File Transfer Is the Bottleneck
Most localization guides focus on the creative side of the process but ignore the logistics. Moving terabytes of data to translators in different time zones is difficult, and it becomes the hidden cost that blows budgets and timelines.
File Size Limits Email attachments top out at 25MB. Consumer cloud storage platforms like Google Drive struggle with single files over 5GB, and many impose daily upload limits. Video masters and raw recording sessions routinely exceed these limits. A 60-minute 4K ProRes file can hit 150GB. When your platform forces you to split files or compress them, you introduce errors and add manual steps that slow everyone down.
Upload and Download Speeds Even when file size is not an issue, transfer speed becomes the constraint. Traditional file sharing uses HTTP-based progressive downloads that perform poorly for large files, especially over international connections. Large files over slow connections can take many hours. If the connection drops near completion, some services make you start over from the beginning. Post houses have lost entire days to failed transfers.
Security Risks Localization often involves pre-release content. Film dailies, unreleased commercials, and confidential corporate communications all pass through the localization pipeline. Sending a physical hard drive is slow and vulnerable to loss in transit or customs seizure. FTP servers are notoriously difficult for non-technical creatives to use securely, and credentials often get shared in plaintext email. The risk of a leak can outweigh the cost savings of going with a cheaper solution.
Version Control Chaos
With five different languages and multiple revision rounds, naming conventions break down fast. Without a structured system, you end up with filenames like Promo_FINAL_FR_v3_REAL_FINAL.mov. Vendors work on the wrong files, duplicating effort and wasting budget. A single misnamed file can cascade into reshoots and re-records if discovered too late in the process.


Speed Up Your Localization Handoffs for video localization
Stop waiting for uploads. Securely share video masters and audio stems with translators worldwide using your existing cloud storage.
How to Organize Files for Localization
Before you send a single link, organize your folder structure. A clean hierarchy prevents confusion and ensures vendors find exactly what they need without back-and-forth questions that eat into your timeline.
Recommended Folder Structure
The structure below separates source assets from vendor deliverables and creates clear lanes for each language. Adopt it as your starting template and adjust based on project complexity. ```text /Project_Name /01_Source_Assets /Video_Master (ProRes/DNxHR) /Audio_Stems (Split dialogue, M&E) /Graphics_Project (After Effects/Premiere) /02_Reference /Scripts (Time-coded, SRT/XML) /Brand_Guidelines /Style_Guide /03_To_Vendor /Batch_01_2026-01-31 /Batch_02_2026-02-15 /04_From_Vendor /FR (French) /ES (Spanish) /DE (German) /JA (Japanese) /PT-BR (Portuguese - Brazil) /05_Final_Deliverables /06_Archive
**Naming Conventions**

Adopt a rigid naming convention from day one. Include the project code, language code using ISO 639-1 plus region if needed (FR-FR for France, FR-CA for Quebec), content type, date, and version number. Example: `PROJ123_Promo_FR-FR_Mix_2026-01-31_v01.wav`

**Batch Organization**

For projects with multiple deliverables, organize by batch date rather than creating a single massive transfer. This approach has three benefits: it limits the blast radius if something goes wrong, it lets you stagger vendor workloads, and it creates natural checkpoints for budget tracking. Each batch folder should contain a manifest file listing every asset, its checksum, and its purpose.

**Access Control by Folder**

Different vendors need access to different parts of the project. Your Spanish voice actors do not need the German audio stems. Your subtitle editors do not need access to raw graphics projects. When your file sharing system supports granular folder permissions, you reduce both security risk and vendor confusion. Share specific sub-folders rather than the entire project root.
Choosing the Right File Sharing Method
You have three main options for moving localization assets. Each has tradeoffs in speed, cost, security, and usability. The right choice depends on your volume, budget, and security requirements.
Option 1: Cloud Storage with Large File Support
Modern cloud platforms are the standard for most localization teams. Look for services that support unlimited file sizes, offer fast upload speeds regardless of file size, and provide granular sharing controls. The best platforms let you create "hot folder" workflows where editors drop files into a local folder and have them immediately available to vendors. Key features to evaluate: concurrent upload and download support, resumable transfers that do not restart on connection drops, and the ability to share specific folders without exposing your entire workspace. For video production teams, streaming preview capability is also valuable. Vendors should be able to review files before downloading the full master, which catches issues earlier and reduces wasted bandwidth. Platforms with HLS streaming let reviewers scrub through footage instantly rather than waiting for a progressive download to buffer.
Option 2: Accelerated File Transfer (UDP-Based)
For time-critical broadcast workflows where hours matter, UDP-based transfer tools like Aspera or Signiant offer maximum speed by bypassing TCP congestion control. These tools can saturate your available bandwidth regardless of distance. However, they typically come with high licensing costs, require client software installation on both ends, and demand dedicated IT support. For most marketing and corporate video projects, the complexity is overkill. Reserve UDP acceleration for live broadcast workflows or when your transfer volumes justify the investment.
Option 3: Physical Media Shipping
Shipping hard drives, sometimes called "sneakernet," remains viable for large transfers or when internet infrastructure is poor. It is secure from network-based attacks but vulnerable to loss, damage, and customs delays. International shipments can take one to two weeks and may face import duties or security holds. It effectively halts your workflow while the drive is in transit. Use physical media as a backup option or for archival delivery, not as your primary workflow.
Hybrid Approaches
Many teams combine methods. They use cloud sharing for scripts, subtitles, and reference materials that vendors need immediately, then ship physical drives for the largest masters. This approach reduces time pressure on large transfers while keeping the workflow moving for smaller assets.
Security for Pre-Release Content
When localizing sensitive content like film dailies, unreleased commercials, or confidential training materials, security is a top priority. A leak before launch can damage brand reputation, trigger legal action, and destroy vendor relationships.
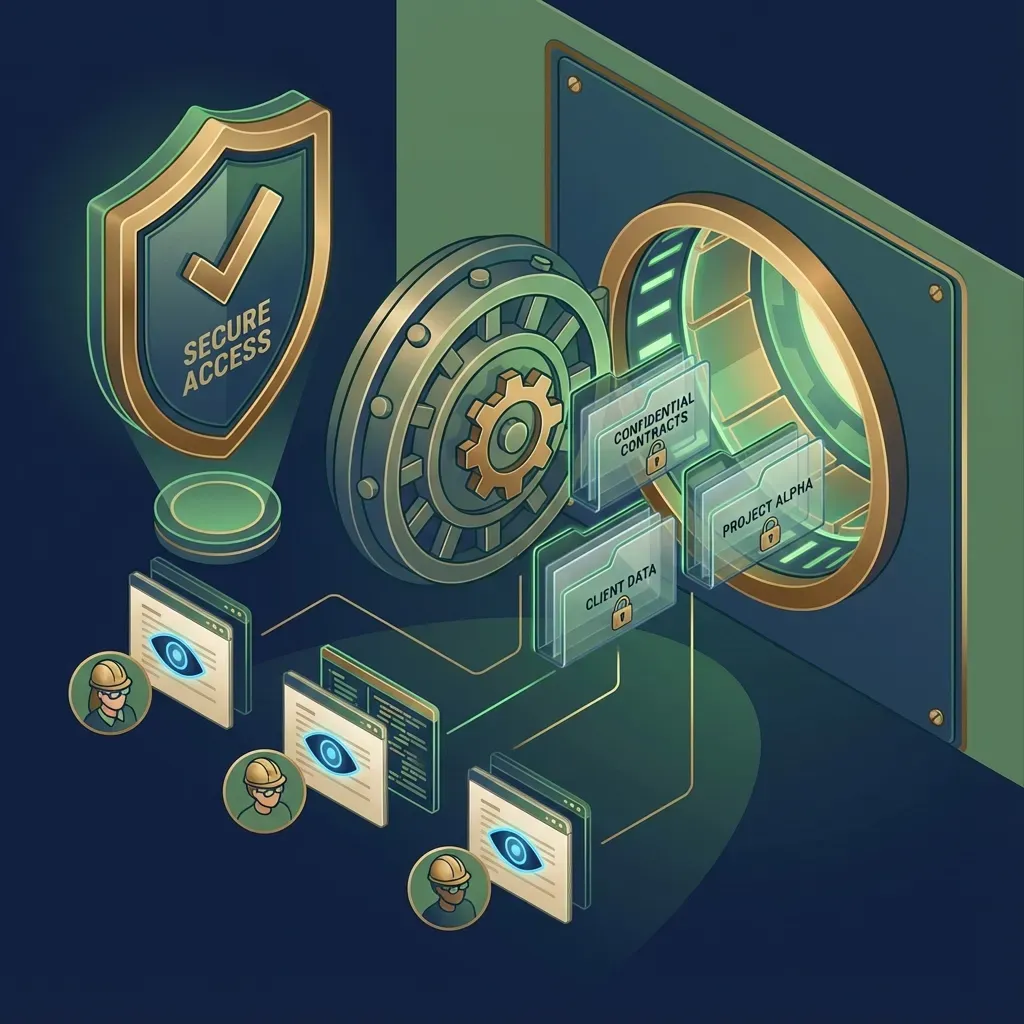
Granular Permissions
Never give a vendor access to your entire project directory. Use a file sharing system that allows you to share specific sub-folders without exposing other languages or projects. Your German translation vendor should see only /To_Vendor/DE/ and /From_Vendor/DE/, not the French assets or the original source files. This principle of least privilege reduces both accidental exposure and intentional theft.
Expiring Links
Set download links to expire after a specific date. A one-week expiration window works for most active projects. After the project wraps, reduce active links to minimize the risk of old URLs floating around in email threads or vendor ticketing systems. Some platforms let you set both time-based and download-count-based expiration, so a link becomes invalid after one use or after the deadline, whichever comes first.
Password Protection
Always password-protect sensitive transfers. Send the password via a separate channel, such as a secure messaging app or phone call, rather than including it in the same email as the link. This prevents a single compromised inbox from exposing your content. For high-security projects, consider unique passwords per vendor so you can trace any leak to its source.
Watermarking
For the most sensitive content, visible or forensic watermarks let you trace leaks back to specific recipients. Visible watermarks with vendor names or codes deter casual sharing. Forensic watermarks embedded in the video stream are invisible to viewers but detectable through analysis, allowing you to identify the source of leaked copies even after they have been re-encoded or screen recorded.
Audit Trails
Maintain a complete log of who accessed what and when. Good audit trails track file views, downloads, permission changes, and login events. If a leak occurs, this data helps you identify the source and scope. It also demonstrates due diligence to clients who ask about your security practices. Look for platforms that export audit logs for compliance documentation.
Managing Feedback and Revisions
Localization projects involve multiple revision rounds. Scripts get refined, dubs get re-recorded, and subtitles get adjusted for readability. Without a structured feedback system, notes get lost in email threads and the same issues get flagged repeatedly.
Centralized Review Workflows
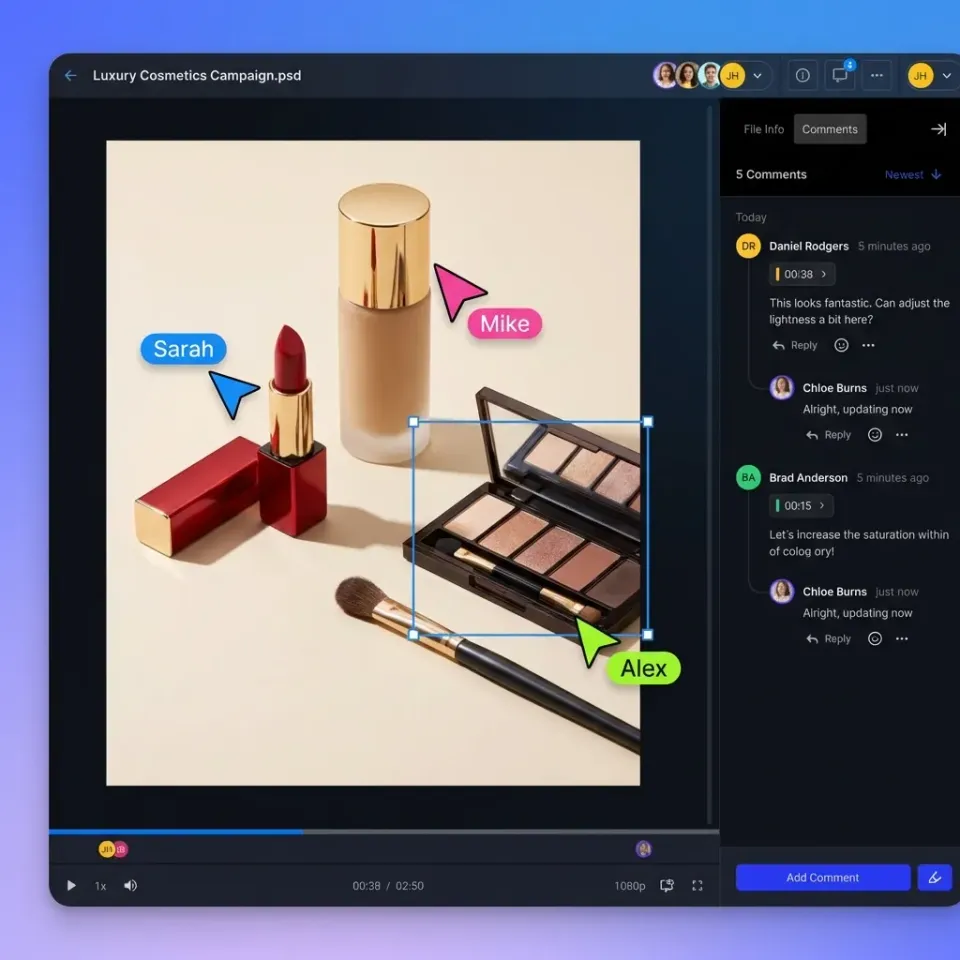
Keep all feedback in one place rather than scattered across email, Slack, and sticky notes. The best review workflows let stakeholders comment directly on files with frame-accurate timestamps for video and page-specific notes for documents. When a reviewer can click on a video frame and type "lip sync off here," the editor knows exactly where to look.
Version Tracking
Maintain clear version history so reviewers always know they are looking at the latest cut. Name files with version numbers (v01, v02, v03) and archive superseded versions rather than deleting them. When a client asks to revert a change from three rounds ago, you need access to that earlier version. Good platforms track versions automatically and let you compare any two revisions side by side.
Approval Workflows
Define clear approval stages: internal review, client review, linguistic QA, technical QA, final sign-off. Each stage should have an assigned approver and a deadline. Automated reminders help when approvers are juggling multiple projects. Once a file reaches "approved" status, lock it from further edits to prevent accidental changes before delivery.
Batch Feedback Export
At project close, export all feedback and approval records for archival. This documentation protects you in disputes about scope changes and provides a reference for future projects with the same client. Vendors can also use this data to improve their processes based on the types of issues flagged.
Building a Repeatable Localization System
The difference between a chaotic localization project and a smooth one is having a repeatable system. Document your process so every project follows the same structure, regardless of who manages it.
Create Templates
Build folder structure templates that your team clones for each new project. Include placeholder files for manifests, vendor agreements, and delivery specs. When everyone starts from the same template, nothing gets forgotten.
Standardize Deliverables
Define your technical specifications once and share them with every vendor. Document required video codecs, audio channel configurations, subtitle formats, and file naming conventions. Vendors appreciate clear specs because it reduces revision rounds. Clients appreciate consistent deliverables because it simplifies their downstream workflows.
Vendor Onboarding
Create a vendor onboarding packet that explains your file sharing platform, naming conventions, feedback process, and security requirements. Walk new vendors through the system before their first project rather than troubleshooting during a deadline crunch. Good vendors will have their own preferences, so be open to adjusting your workflow when their suggestions improve efficiency.
Post-Project Reviews
After each localization project, spend a brief time documenting what worked and what did not. Did the folder structure hold up? Were there security incidents? Did any vendors struggle with the file sharing platform? Feed these lessons back into your templates and processes. Over time, your system becomes tighter with each project.
Capacity Planning
Track your file transfer volumes and peak bandwidth usage across projects. This data helps you negotiate better rates with file sharing providers, identify when you need to upgrade plans, and forecast costs for upcoming projects. If you consistently push hundreds of GB per project, your pricing discussions should reflect that volume.
Frequently Asked Questions
What files do I need to send for video localization?
You typically need to send a high-quality video master (ProRes or DNxHR without burned-in text or graphics), separate audio stems (dialogue, music, and effects split out as separate tracks), a time-coded script in editable format, and project files for any on-screen text or graphics that need translation. For dubbed content, you will also need the M&E (Music and Effects) track so engineers can mix the new voice tracks cleanly.
How do I share large video files for translation?
Use a secure cloud storage solution that supports large file sizes without compression and offers fast upload speeds. Avoid email or consumer file transfer sites that compress video or impose daily limits. Create a dedicated shared folder for each vendor with granular permissions so they have a single location for downloads and uploads without access to unrelated project assets.
What is the difference between dubbing and voiceover?
Dubbing replaces the original speaker's voice entirely, with voice actors matching lip movements and timing as closely as possible. This requires skilled talent and careful direction. Voiceover typically retains the original audio at a lower volume in the background or is used for off-screen narration, prioritizing translation clarity over lip-sync. Dubbing costs more but creates a more immersive viewing experience for the audience.
Why is a Music and Effects (M&E) track important for localization?
An M&E track contains all the audio except the dialogue: music, ambient sound, and sound effects. This allows localization engineers to mix the new translated voice tracks with the original soundscape cleanly. Without an M&E track, they would have to recreate the entire audio environment from scratch or try to isolate dialogue, which introduces quality issues and increases cost .
How long does a typical video localization project take?
Timeline varies by content length and number of languages. A short corporate video localized into several languages typically takes several weeks from handoff to final delivery. This includes script translation (several days), voice recording (about a week per language, often parallelized), audio mixing (a few days per language), QA review (a few days), and revision rounds. The file transfer process should not add significant time if you have a proper workflow in place.
Related Resources

Speed Up Your Localization Handoffs for video localization
Stop waiting for uploads. Securely share video masters and audio stems with translators worldwide using your existing cloud storage.